Getting started with Jumpshare screen recording
Recording your screen with Jumpshare is fast and simple. Our screen recording software captures your screen in up to 4K/Ultra HD quality, alongside your webcam, audio, and click-tracking animations. Once finished, your video automatically uploads to the cloud for instant sharing via a single link.
Our Jumpshare screen recording software also comes built-in with professional screenshot capture, advanced annotation tools, and quick GIF capture capabilities to streamline all your daily visual tasks in one place.
How to Record Your Screen with Jumpshare
Step 1: Launch the Screen Recorder
- Download and install the Jumpshare desktop app for Mac or Windows.
- Open the Jumpshare app on your desktop.
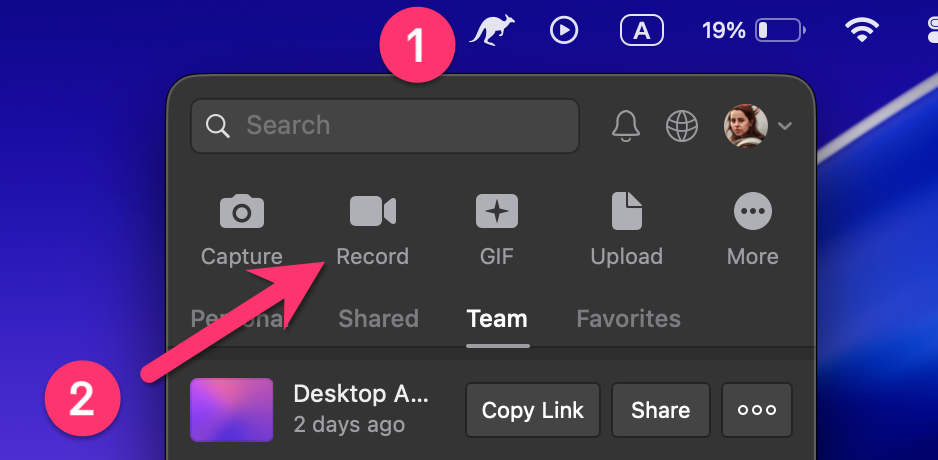
- Click the Record button (the video camera icon) at the top bar of the window to open the recording panel.
Step 2: Configure Your Screen Capture Settings
Before hitting record, select the exact area of your screen you want to capture:
- Capture Modes: Choose between Full Screen, a Custom Region, a specific Window Selection, or reuse your Last Selected Region.
- Mobile & Social Presets: Lock your capture area to modern aspect ratios like 9:16 for mobile-first vertical video or 1:1 for square content.

Once your recording area is set, use the Floating Control Bar to adjust your microphone, webcam, or annotation tools on the fly. You can drag and position this bar anywhere on your screen so it stays out of your way while you record.
- Click-Tracking Settings: Turn on cursor recording and choose a click-tracking color to highlight your mouse movements for your viewers.
- Enable Audio & Microphone: Click the microphone icon to turn your audio on or off, change your audio source, or enable one-click system audio to capture internal computer sounds.
- Enable Webcam: Click the webcam icon to turn your camera on or off. You can flip your camera, change the webcam size, snap it to any corner, or choose from multiple styles (Circle, Portrait, Squircle, or Landscape). Once the recording starts, you can also add a webcam background or set it to none.
- Add Speaker Notes: Open a private text box on your screen to read from your notes while you record. Your audience will not see these notes.
- Add Blur Option: Protect sensitive information by selecting an area to blur out before or during your recording.
- Show Confetti: Trigger a fun confetti animation on your screen to celebrate milestones or achievements during your presentation.

Step 3: Record and Use In-Video Controls
Click the red Record button to start. After a brief countdown, a floating control menu appears on the side of your screen:
- Pause / Resume: Temporarily pause your recording to gather your thoughts, and resume whenever you are ready.
- Draw (Annotate): Use the pen, pencil, arrows, text, numbers, and custom colors to draw directly on your screen in real-time. You can also adjust tool thickness and set the visibility duration for your drawings.
- Restart Recording: Discard your current take and immediately start a fresh recording with a single click.
- Exit / Discard (Trash Icon): Click the trash can icon to instantly exit the recorder and delete the recording.

Advanced Screen Recording Settings
You can fully customize your recording preferences directly from the app settings (Profile Icon > Preferences):
- Streaming Uploads: Enable this feature for instant uploads. Jumpshare uploads your video to the cloud while you record it, making your video link ready to share just a few seconds after you click stop.
- Video Quality & Frame Rate: Choose your preferred video resolution from 720p up to 4K Ultra HD, and set your frame rate to 15 fps, 30 fps, or 60 fps.
Screen Recording Keyboard Shortcuts
Save time by using global hotkeys to start, pause, or finish your recordings instantly. You can also set custom shortcuts for all screen recording functions within the Preferences menu.
Default Windows Shortcuts:
- Start / Finish Recording:
Alt + Shift + S - Pause / Resume Recording:
Alt + Shift + P
Default Mac Shortcuts:
- Start / Finish Recording:
Cmd + Shift + S - Pause / Resume Recording:
Cmd + Shift + P
If anything’s unclear, reach out to us anytime at support@jumpshare.com. We're happy to walk you through anything! 🙂